How to Identify Morel Mushrooms: A Beginner's Field Guide
Of all the mushrooms a forager can find, few inspire as much excitement — or as much caution — as the morel. They're hollow, honeycomb-capped, and fleeting. They appear for just a few weeks each spring, then vanish until next year. And they taste incredible. This wild mushroom identification guide will teach you exactly what to look for, so you can forage with confidence.
What Do Morel Mushrooms Look Like?
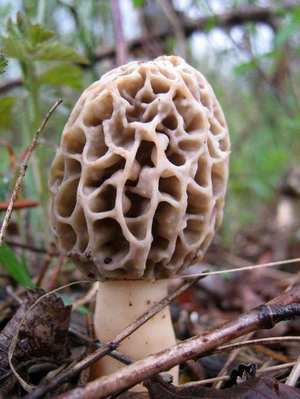
Morel mushrooms (Morchella spp.) are immediately recognizable once you know what you're looking for. The cap is the giveaway: it has a distinctive honeycomb or pitted lattice texture, with deep ridges forming irregular pockets across the surface. The color ranges from cream and tan to golden-yellow or even pale gray, depending on the species and maturity.
The stem is stout, hollow, and usually lighter in color than the cap — often cream to off-white. In a true morel, the cap attaches directly to the stem at its base, and the entire mushroom — cap and stem — is completely hollow when sliced lengthwise. This hollowness is one of the most reliable identifiers.
Sizes vary widely. Young morels may be barely an inch tall. Mature specimens can reach 4–6 inches. Larger isn't necessarily better — small morels are often firmer and better for cooking.
True Morel vs. False Morel: Know the Difference
The most important safety distinction in morel hunting is recognizing the false morel (Gyromitra spp. and related genera). Mistaking a false morel for a true morel can cause serious illness. Here's how to tell them apart:
True Morel (Safe)
- Cap has a pitted, honeycomb-like texture with distinct ridges and pits
- Cap is attached to the stem at the base
- Interior is completely hollow — no chambers, no cottony filler
- Fruiting body is a single continuous hollow cavity from cap to stem base
False Morel (Toxic)
- Cap is wrinkled, lobed, or brain-like — not uniformly pitted
- Cap may hang free from the stem, attached only near the top
- Interior is chambered or partially filled — not fully hollow
- Often more reddish-brown or saddle-shaped
When in doubt, slice the mushroom lengthwise from top to bottom. A true morel opens into a single clean cavity. A false morel reveals internal walls or a filler of cotton-like tissue.
Where to Find Morel Mushrooms
Location is everything with morels. They're mycorrhizal — meaning they form relationships with tree roots — and their preferences are highly specific:
Dying and Dead Elm Trees
The single most reliable morel habitat in the Northeast is the area around dying or recently dead American elm trees. As elms die from Dutch elm disease, they become prime morel territory. Look at the drip line of the tree, not just at the base. A single dying elm can produce morels for several years.
South-Facing Slopes
Morels love warmth. South and southwest-facing hillsides receive more sun and warm up faster in spring, triggering earlier flushes. These spots are especially productive in the early season when flat ground is still cold.
Disturbed Soil and Forest Edges
Old orchards — especially abandoned apple orchards — are classic morel spots. Old burns are another: areas that experienced fire 1–3 years prior sometimes produce extraordinary morel crops. Forest edges where sunlight hits the ground, old logging roads, and areas with disturbed soil are worth checking.
Other Tree Associations
Beyond elm, morels also associate with ash, cottonwood, sycamore, and tulip poplar. In late season, look under apple and pear trees in old orchards.
When to Hunt: Timing Is Everything
Morel season in the Northeast typically runs from mid-April through late May, but the real trigger is soil temperature. When soil temps reach 50–55°F at a depth of about 2 inches, morel season begins. An inexpensive soil thermometer is one of the most useful tools in a forager's kit.
Elevation matters too. Valley floors and south-facing slopes peak first; north-facing slopes and higher elevations may peak 1–2 weeks later. A savvy forager works the elevation gradient to extend the season.
Rain followed by a few days of warmth is the classic recipe. Watch the 10-day forecast: a stretch of warm nights (above 40°F) after a good rain usually means morels are pushing up.
How to Harvest Morels Cleanly
Use a small folding knife or scissors to cut morels at the base, leaving the very bottom of the stem in the ground. This keeps your harvest clean and avoids pulling up the mycelium. A mesh or woven bag is better than a plastic sack — it allows spores to fall as you walk, potentially spreading morels for future seasons.
Cut each mushroom in half in the field if you're unsure. The hollow interior check takes two seconds and should be a habit every time you harvest a new patch.
Brush off soil and debris gently. Morels can harbor insects — a light soak in salted water for 15–20 minutes back at camp will drive out any hitchhikers.
Go Deeper with the Morel Hunter's Field Guide
This guide covers the fundamentals, but serious morel hunters know that the real edge comes from habitat maps, seasonal timing charts, and knowing the look-alikes cold. Our Morel Hunter's Field Guide is a comprehensive digital PDF with habitat maps for the Northeast, detailed look-alike comparisons, and recipe tips.
Browse the Store — Morel Hunter's Field Guide
Join a growing community of mushroom foragers
Learn to identify what you pick before you eat it — share finds, ask questions, and forage with confidence alongside thousands of fellow hunters.
Join the Community